{
    "lazyNodes": false,
    "abFitnotesFlag": false,
    "abCrawlReviews": false,
    "productOptionsCookie": false,
    "orderDelayFlag": false,
    "skipSessionCookie": false,
    "covidMessage": false,
    "fullTitleCookie": false,
    "nrLoggerCookie": false,
    "checkoutReviewCookie": false,
    "productOptionSeqCookie": false,
    "maintenanceFlag": false,
    "bufferETACookie": false,
    "multiShippingDiscountFlag": false,
    "newFitmentFlag": false,
    "surveyOptInFlag": false,
    "crossSellFlag": false,
    "skuMappingFlag": false,
    "paySplitCookie": false,
    "callDisableFlag": false,
    "zipPaymentFlag": "u",
    "hassleFreeReturn": false,
    "lifetimeReplacement": false,
    "cpn_off": false
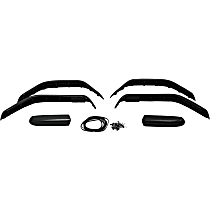
}Jeep CJ5 Fender Flares
Shop Catalog
![]() WARNING: This product can expose you to chemical which is known to the State of California to cause cancer and birth defects or other reproductive harm. For more information go to www.P65Warnings.ca.gov.
WARNING: This product can expose you to chemical which is known to the State of California to cause cancer and birth defects or other reproductive harm. For more information go to www.P65Warnings.ca.gov.
Top Rated Products
Popular Products
Product Questions & Answers
Customer Guides
Key Tips in Maintaining the Jeep CJ5 Fender Flares
The fender flares for your Jeep CJ5 are designed to last as long as your vehicle, but without proper maintenance, they can still succumb to wear sooner than you expect. Cleaning and maintaining your Jeep CJ5 fender flares is essential in keeping these parts in top condition. Maintenance will only take an hour or two but it will go a long way when it comes to extending the life of the flares. The following are some key maintenance pointers you can follow to properly care for the fender flares of your Jeep CJ5:
- Wash the fender flares by hand.
Ridding the fender flares of dirt, mud, and stains goes a long way in keeping it in good shape, but simply driving your truck to the drive-in car wash is not enough. Instead, it is strongly advised to wash the flares by hand. Aside from saving some money, washing the fender flares manually will allow for a comprehensive cleaning especially for those hard-to-reach areas such as the bolt holes.
Most car shampoos sold in stores are safe for use on your fender flares, although steer clear of products that contain ammonia as this strip the paint off the flare. It is also recommended to use a wash mitt or a microfiber cloth, as it will not leave scratches on the surface compared to brushes and sponges.
- Protect unpainted fender flares with tire cleaner.
Tire cleaners can help make tires look brand new again, and they can do the same for unpainted fender flares. Tire cleaners that use silicone polymer blend, in particular, are great for flares as they leave a long-lasting shine on the surface and protection against harmful UV rays.
- Take note of any loose or missing bolts.
The bolts mounted across the fender flares rarely come loose, but improper tightening and constant vibration can make them come off. So make sure to check if the bolts are properly tightened and take note of any rattling sounds while driving as this is an indication of loose hardware on the flare.
- Don't forget about the seals as well.
The synthetic rubber seals running along most fender flares keep dirt and moisture away from the flare's adhesive backing and mounting points, but they can get nicked by flying rocks and debris. Constant exposure to the sun can also cause the seals to dry out and become brittle, resulting in cracks. So if you notice any sign of damage on the fender flare seals, have it replaced as soon as possible.
The fender flares are optional accessories for many vehicles, but for the Jeep CJ5, they are an essential component. Due to their unique design, the Jeep CJ5 fender flares cover the entire width of the wheels, so when they get damaged or worn beyond repair, it has to be replaced as soon as possible. Most mechanics can handle replacement of the fender flares, but they are easy enough to be replaced on your own provided that you have the necessary tools on hand. Here are some tips on how you can install a new set of fender flares to the Jeep CJ5:
Tip #1: Detach the cables from the battery.
Removing the fender flares will require you to remove the wiring harness for the turn signal lights mounted on the front of the truck, so it is recommended to remove the battery cables to prevent electric shock.
Tip #2: Replace the old hardware with new ones.
Most fender flare manufacturers recommend replacing the stock mounting hardware of the fender flares such as the hex nuts and screws. If the fender flares have worn out to the point of needing replacement, it's likely that some of the fasteners have also suffered significant wear. But even if all the hardware remains in good condition, it is still advisable to use new ones as they are specially designed for use with the new flares. Fender flare kits often include all the necessary hardware plus a few extra pieces just for this purpose.
Tip #3: Use the old fender as a template.
Once the old fender flare has been removed, don't throw it out just yet. You can use it as a baseline to adjust the position of the new fender flare onto the fender. Newer fender flare models may also have locator pins that can make the alignment process easier.
Tip #4: Do not tighten all the screws at first.
It's a common mistake for beginners to immediately tighten each bolt or screw they insert on the mounting points. Doing so will actually make alignment of the fender flares more difficult and potentially damage the threads. Instead, loosely install all of the screws onto the fender at first. Once all the screws are in place and you're already sure about the position of the new flares, it's time to tighten them snugly in place.


