{
    "lazyNodes": false,
    "abFitnotesFlag": false,
    "abCrawlReviews": true,
    "productOptionsCookie": false,
    "orderDelayFlag": false,
    "skipSessionCookie": false,
    "covidMessage": false,
    "fullTitleCookie": false,
    "nrLoggerCookie": true,
    "checkoutReviewCookie": false,
    "productOptionSeqCookie": false,
    "maintenanceFlag": false,
    "bufferETACookie": false,
    "multiShippingDiscountFlag": false,
    "newFitmentFlag": false,
    "surveyOptInFlag": true,
    "crossSellFlag": false,
    "skuMappingFlag": false,
    "paySplitCookie": false,
    "callDisableFlag": true,
    "zipPaymentFlag": "c",
    "hassleFreeReturn": true,
    "lifetimeReplacement": true,
    "cpn_off": false
}Dash Trims
Shop Catalog
![]() WARNING: This product can expose you to chemical which is known to the State of California to cause cancer and birth defects or other reproductive harm. For more information go to www.P65Warnings.ca.gov.
WARNING: This product can expose you to chemical which is known to the State of California to cause cancer and birth defects or other reproductive harm. For more information go to www.P65Warnings.ca.gov.
Shopping for Dash Trim
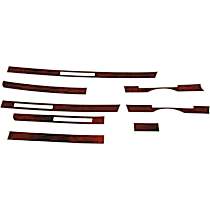
Tired of how your vehicle's dashboard looks? Maybe it's time you change its appearance and give it some extra style. Fortunately, restyling your vehicle's dashboard isn't hard to do. All you need is the right dash trim. This dash accessory can noticeably improve the looks of the dashboard, making it more stylish and attractive. Dash trim is available in a variety of finishes, such as synthetic wood, carbon fiber, colored plastic, chrome, and aluminum. Today, each set of dash trim is designed and manufactured using the latest technology to ensure perfect fit. Carparts offers both molded dash and flat kits for most vehicle makes and models. Our dash trim kits also come in a wide assortment of trim colors. Check out our dash trim catalogs now!
• Each set of dash trim available is made from high-quality, durable materials.
• Whatever dash trim kit you choose, your vehicle's dashboard is guaranteed to be more stylish after installation.
• The dash trim kits we offer are easy to install; your vehicle's dashboard can go from boring to stylish in a few minutes.
Custom jobs are a tricky but rewarding business. The Internet is rife with immortalizations of some of the worst trim jobs in history. The key, however, lies in knowing what you need to work around and what you have to work with even before you begin. We've prepared this simple and easy-to-follow guide to help you with your choices.
Make sure it fits
The differences between make and model across the years are great enough to mean that you have to be extremely careful when choosing a dash trim. It's not enough to start matching things, however. You also have to be aware of the dimensions of the specific area that you want to apply trim to.
Whether it's the entire length of the dashboard, the area around the a/c vents, the central panel or anywhere else, it pays to double check these dimensions-available in the vehicle's manual against the specifications of the dash trim you are getting. It will certainly save you a lot of heartache!
Material matters
When it comes to selecting the material from which your dash trim will be made from, the real thing that matters here is personal taste. For once, looks take precedence over durability-all are designed to last long anyway.
- Carbon Fiber: Almost always in black, this material is the only one that imparts a different feel on top of a different look. The raised ridges give you an ordered, non-glossy look as well. Carbon fiber is eye-catching, despite not being so shiny!
- Wood Panel: Considered a classic look and almost always emulating the look of rich Oaks and deep Mahogany, this is the custom of choice for those harkening back to the days before plastics became common.
- Aluminum: This is the most common of all the materials and looks and is actually a standard on most mid-range automobiles. It's simple (or dull-depending on where you stand) and not too obtrusive.
- Chrome: A material that is most clearly seen, this is perfect for those who truly want to shine and show off their custom jobs. It, of course, is very elegant-looking, if somewhat glaring when under sunlight.
The right price
We hate to say "it depends", but it really does depend on a number of factors. Prices for a trim kit can range from as low as $100 to as high as a couple of thousand. It helps though to do the customization yourself-more importantly, it helps to have a clear vision of what you want to do. Many people overspend by buying a whole kit when all they wanted was to change the trim on the a/c vents, for instance.
When you've had a car for a couple of years, it starts to get old-obviously. The thing is that it doesn't have to look old. A lot of people are hesitant to undertake dash trim installations because they fear mucking up the job so terribly-no one wants a half-baked, amateur looking dash. It's pretty easy, though, and this guide makes it so much easier to boot! Just remember that the interior vehicle temperature should be at least 72?F. This prevents the formation of dew and moisture on the surfaces that you intend to attach to-that will mess up your trim work in a very terrible way!
Difficulty level: Easy
Stuff you'll need:
- New dash kit
- Rubber gloves
- Isopropyl alcohol
- Paper towels
- 3M Adhesive promoter-readily available at Wal Mart
- Hair dryer (optional)
- Masking tape
Step 1: Test fit the dash trim that you purchased. This will help you to figure out if you bought the right kit, and it will serve as a dry run for the actual installation process.
*NOTE* Take as much time on this step as you feel that you need and make sure that all buttons and vents are not restricted in their movement. Once the adhesive is involved, it will be exceedingly difficult to correct any errors you make!
Step 2: Clean the areas on the dash that you are going to install in as thoroughly as you can with isopropyl alcohol. Make sure that no dust, lint, moisture, or dirt remains-all of these can negatively affect adhesion and make a muck of your installation.
*NOTE* If you've had vinyl treatments applied onto your dash, be even more thorough in your cleaning. As a general rule, the look you want to have on your dash before you start installing your dash trim is totally dull. Masking tape can be used to test whether the cleaning was effective.
Step 3: Apply adhesive promoter on areas where you plan to install a flat overlay only. Use gloves especially when carrying out this step as the promoter is corrosive-do this priming step at a quick pace.
*NOTE* Fast doesn't mean careless-make sure that you apply the promoter on the areas you want to apply trim to as it tends for permanently discolor any area it comes into contact with.
Step 4: Warm the trim pieces under the sun (or with a hair dryer) for a good minute to make them more flexible.
Step 5: Carefully peel off the adhesive backing and, with equally care, gently position the trim pieces in place on the dash. Do not press down to secure them just yet.
Step 6: Align them to make sure they're in the right place. When you are satisfied, press down hard to secure the installation.
Step 7: Stand back and admire the great job you just did!


