Defroster grids are a huge convenience, especially in the wintertime. The grid is made up of thin metal lines that run across your rear windshield. Using the energy from your vehicle’s electrical system, the grid warms up the glass to defrost ice or snow and remove fogging. As you can imagine, if your defroster grid stops working, it can be a pain to drive in the colder or foggier months due to the lowered visibility. Typically, the reason the grid stops working is because of a break in the grid’s lines.
Most typically, just one or two of the grid lines will cease to function but the others will still work. This will be due to a break in the operative grid’s lines. In other cases, the bus connection where the wire connects to the grid may become detached, and this’ll kill the entire grid. The good news is that a detached bus connection is easy to spot.
Replacing your entire windshield to fix the grid is an option, but it’s also very expensive. Most people will just put up with a few grid lines that don’t work rather than even trying to do anything about it.
But dedicated DIY-ers prefer to fix their rear window defroster grids themselves using a store-bought kit, and there are many kits available. If you do choose to repair your rear window defroster yourself, there are some key tips and tricks you should know to make the process easier and more likely to succeed.
Purchase the Correct Type of Defroster Repair Kit
The type of damage your defroster grid sustained will determine the type of repair kit you need. A defroster grid repair kit will typically contain some conductive material that you’ll use to paint onto the glass yourself. Other kits will have the connector tabs found at the ends of certain lines.
There are also kits that contain the entire grid for you to stick onto your windshield, but these are typically not as aesthetically pleasing to the eye because the grid lines are thicker. There are kits to reattach the wire lug to the bus and there are kits to repair individual grid lines.
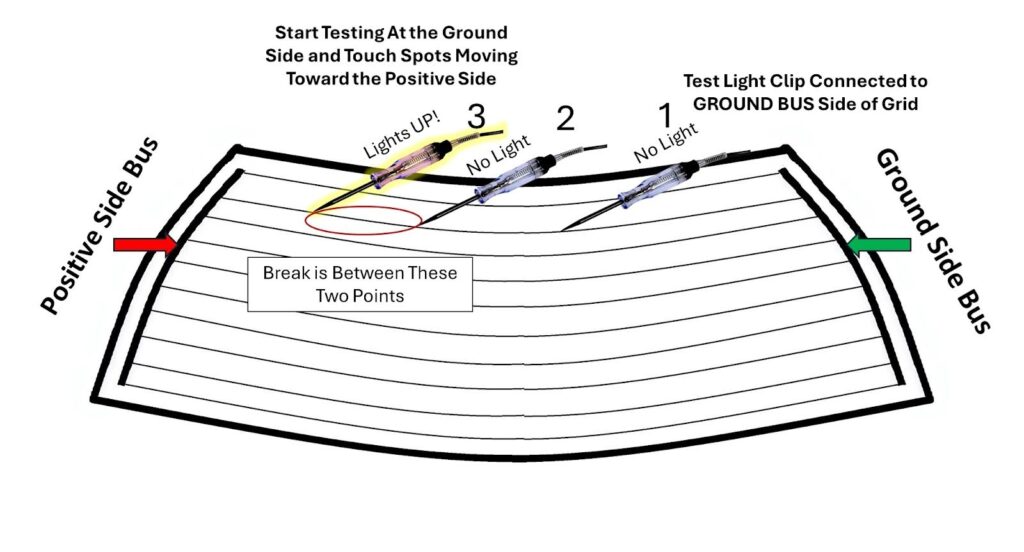
That’s why it’s best to identify first why your rear window defroster is not working. Examine your defroster grid for scratches and check the connector tabs using a multimeter before deciding which kit to buy. The best way is to use a test light to find the spot where the grid is broken, because sometimes the break is difficult to see.

You should also check the defroster grid fuse to make sure the issue isn’t due to a blown fuse. If the fuse is blown, the indicator light won’t come on when you energize the grid with the timed switch that brings it to life.
Prepare Your Window Beforehand
It’s important to clean your windshield before you begin your repairs. Dust or grime can interfere with the installation and dirty up the conductive paint as you apply it to your grid. The adhesive won’t stick well to a dirty surface. If you’re repairing a small, scratched-up area, you might be able to get away with wiping down just that part of your windshield, but at that point, why not clean the whole thing? In addition, a clean window will allow you to see the whole windshield much more clearly and identify where the grid’s been scratched up. Make sure your grid is off before you do this though.
Use a Voltmeter To Find Breaks
If you’re having a difficult time finding the scratches on your defroster grid that are causing you trouble, try using a voltmeter. Turn on your defroster grid and measure from one side of the grid to the other.
Your voltmeter should read around 12 volts. Place your voltmeter probes on either end of a damaged grid line before moving one to the center of the line. If the meter reads 6 volts at the center, the scratch isn’t between those probes.
Move the probe back and forth to find the exact location where the voltage starts reading the full 12 volts, and that’s where you’ll find the scratch. Mark the area with a grease pencil so you don’t lose sight of it when it’s time to apply the paint. Once you find all the scratches, make sure you turn off your defroster before making any repairs.

Draw Clean, Straight Lines
To get that clean look with the conductive paint in your defroster grid repair kit, you can use masking tape to block off the area right above and below the existing line. Try to make the space between the tape exactly as thick as the original grid. Be careful not to get any conductive paint on the rest of the glass as you paint over the gap. If you make any mistakes, try using lacquer thinner, rubbing alcohol, mineral spirits, or even cheap vodka to clean up.
Sand Down the Old Defroster Tab
If you’re replacing one of the connector tabs on your defroster grid, you might find that there’s residue on the glass from the old tab. You can try using sandpaper or a file to remove any residue so the new tab sits flat against the glass for a cleaner finish. Be gentle to make sure you don’t scratch the glass.
Be Patient
Patience is key when repairing your defroster grid. You’ll need to wait thirty minutes before removing the masking tape you used as a stencil for the conductive paint. After that, it’ll be another 8 to 24 hours before you can use the defroster grid again. When you replace the connector tab, it’ll take around 24 hours for the adhesive to dry.
Overall, fixing your rear window defroster is a relatively easy project to take on. Here’s hoping these tips and tricks will help make the process even easier.
Get a Replacement Defroster Switch Without Leaving Your Home
If a faulty defroster switch is to blame for your windshield defroster not working, it’s likely time to replace it. You can’t risk driving with frosted windows, after all. It’s incredibly dangerous and puts you and your passengers at risk. Ordering a replacement defroster switch is easy at CarParts.com.
At CarParts.com, we want to make ordering online simple and convenient. Our easy-to-navigate website has multiple filters you can use as you browse our catalog. Once you find a switch you like that fits your vehicle, proceed through our convenient and secure checkout. We offer fast shipping, so if you order by 12pm ET in the continental US, we’ll ship your new switch to your door in as fast as two business days.
Don’t suffer too long with frosted windows in the winter. Purchase a new defroster switch and other replacement parts at CarParts.com.
Any information provided on this Website is for informational purposes only and is not intended to replace consultation with a professional mechanic. The accuracy and timeliness of the information may change from the time of publication.


