When it comes to rebuilding an engine, there are many things you’ll have to take note of to buy the correct replacement parts. This includes engine bore. If you’re lucky, you can find this listed in your engine’s service manual, bringing you one step closer to getting new pistons for your engine. If you’re unlucky, however, you’ll have to measure the engine bore yourself by using a dial bore gauge.
What Is a Dial Bore Gauge?

A dial bore gauge is a type of bore gauge that measures an engine’s cylinder bore, or the diameter of a cylinder. As its name suggests, it has a dial gauge at the top of its shaft and a measuring sled on the other end. Unlike other types of bore gauges, it has three anvils that extend from its body.
Dial bore gauges are typically calibrated in 0.001 inch or 0.0001 inch.
How To Measure Engine Bore With a Dial Bore Gauge
Measuring your engine’s cylinder bore with a gauge by yourself can certainly be intimidating, but it doesn’t have to be difficult. Here are some tips to make the entire process easier:
Set the Dial Bore Gauge to Zero
Before measuring the cylinder bore, you have to set the dial bore gauge first so its range of measurement will include the size of the cylinder bore you’re working with. Most dial bore gauges come with various length pins so you can measure just about any vehicle cylinder bore, but you have to know how to choose the right pin to insert in the gauge.
You can use a setting ring or a master bore for this, but using a micrometer is the most common method. Here’s a guide on how to use a micrometer to set a dial bore gauge:
- Choose a micrometer that can measure your vehicle’s cylinder bore.
- Measure the bore using the micrometer, or set the micrometer according to the bore size specified by the manufacturer.
- Place the bore gauge between the micrometer’s spindle and anvil. Make sure the micrometer and gauge are parallel with one another.
- Turn the bezel to set the dial bore gauge to zero while it’s still positioned in the micrometer.
Once the dial hits zero, you should be good to go.
Insert the Gauge
Place the dial bore gauge into the cylinder hole. Once you’ve inserted it, you’ll have to rotate its knobs to extend the anvils until it hits the inside of the pipe. A good rule of thumb is to place the gauge until it’s around half an inch to one inch below the rim. Make sure the head is level for an accurate reading.
Measure the Bore Size
All that’s left to do is read the measurement indicated on the dial face. Rock the gauge back and forth until the needle starts moving. If the needle stops before zero, then this means the cylinder bore is greater than the bore size specified by the manufacturer. If it falls to the right of zero, then the bore is smaller than it should be.
Write Down the Measurement
If you plan on measuring more than one cylinder, we suggest writing down each measurement on a piece of paper. That way, you’re less likely to mix up any of the readings. It’s best to make a chart for each cylinder you measure if you plan on measuring different points along the cylinder and its axis.
Interpret the Readings
In engine service manuals, manufacturers usually indicate bore size in decimal form. This means you’ll have to translate the measurements you recorded from the dial before you can compare them with the dimensions indicated by your manufacturer.
Take a 0.001-inch balanced dial indicator, for example. If its needle points to 20 on the right of zero, you’ll have to multiply 20 by 0.001 inch. This equals 0.020 inches, which means the cylinder bore is 0.020 inches larger than the master setting. If the needle points to 20 on the left of zero, then it’s 0.020 inches smaller.
What Is Engine Bore?
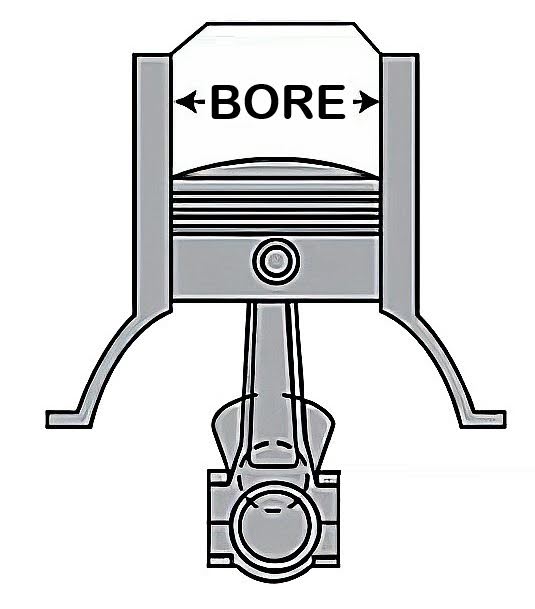
Also known as cylinder bore, engine bore refers to the diameter of each cylinder. Engines with a bigger bore size also have bigger valves, which means they can take in and push out more air than other engines. Because of this, they tend to produce more power than engines with a smaller bore size. However, this also means they need more fuel to function.
Why Should You Measure Engine Bore
Measuring engine bore is necessary if you wish to calculate your vehicle’s engine displacement. You also have to measure bore size to determine the correct piston size if you’re assembling or rebuilding an engine.
How Much Does a Dial Bore Gauge Cost?
The exact price of dial bore gauges will vary depending on several factors, but they can cost anywhere from around $20 to $1,600.
Get a Replacement Engine Parts Without Leaving Your Home
A dial bore gauge is an excellent tool for helping you pick the right pistons when assembling or rebuilding an engine. Once you have the right measurements, all you need to do is order the parts and get to work. Thankfully, CarParts.com is here to make that first step easier.
The CarParts.com catalog includes a ton of quality aftermarket products, all viewable within a few quick clicks. It won’t take long for you to find exactly what you need using our easy-to-navigate website. The built-in vehicle selector can even show you parts that are guaranteed to fit your vehicle’s original engine. Place your order before 12 p.m. ET from within the continental US, and we’ll deliver your parts straight to your door in as fast as two business days. It’s that simple and easy to get the engine components you need quickly.
Now that you know what size your vehicle’s cylinders are, don’t delay. Order new pistons at CarParts.com today.
Any information provided on this Website is for informational purposes only and is not intended to replace consultation with a professional mechanic. The accuracy and timeliness of the information may change from the time of publication.


