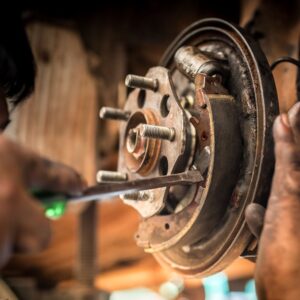
If your car has drum brakes, you need to know that they accumulate dirt like brake dust and mud over time. Dirt can remove the lubricant protecting the brake drums and other brake parts, leading to issues like the brakes making grinding noises. You can wash the grime off to restore its performance, but cleaning drum brakes takes more than just spraying everything with water.
Tips on Cleaning Drum Brakes
Here are some useful tips and tricks that can ease the chore of cleaning your car’s drum brakes:
Prepare Your Tools and Materials
You’ll need certain materials to remove dirt that’s too stubborn for mere water to wash off. Furthermore, you’ll need several tools to remove and reinstall the wheels and drum brakes for easier cleaning.
Here are the things you’ll need to clean your car’s drum brakes:
- Car jack
- Jack stands
- Wheel chocks
- Tire iron or lug wrench
- Wrench
- Pliers
- Brake cleaner
- Wire brush
- Clean cloth
- Safety gear (gloves, mask, and safety glasses)
Drain the Brake Fluid Beforehand
Before cleaning the drum brakes, check the brake fluid for possible replacement. Just like the drum brakes, the hydraulic fluid gets dirty over time. It also degrades because of various problems. You might as well drain old brake fluid and replenish it before removing the brake drums for cleaning.
Find the brake master cylinder in your car. It’s usually in the engine bay and near the brake pedal. An easy way to locate and identify the cylinder is to follow the brake fluid lines that carry hydraulic fluid to the brakes. The lines originate from the brake master cylinder.
Once you’ve found the brake master cylinder, drain at least half of the brake fluid into a container. Use a vacuum sucking tool to thoroughly remove old brake fluid. Some reservoirs have a screen that prevents you from accessing their interior, but if you can reach the inside without damaging the screen, wipe away grime and residue inside. After cleaning the reservoir, top the master brake cylinder off with fresh brake fluid.
For best results, use a vacuum sucking tool to remove all the old brake fluid from the master cylinder reservoir. Wipe out any grime or residue inside the reservoir if you can.
–Anthony Harlin, ASE Certified Master Automobile Technician
Get rid of the old brake fluid according to local regulations. Here’s how to dispose of old brake fluid.
Remove the Wheels First
The wheels block easy access to the drum brakes. While you can wash the brakes with the wheels on, the chore becomes much easier if you remove the obstructions.
Loosen the wheel’s lugs with a tire iron or lug wrench. Turn each fastener counterclockwise to loosen it. However, don’t remove the lugs yet.
Next, use a car jack to raise your vehicle until there’s enough clearance between the tires and the ground. Put jack stands under your car or truck to keep it raised. Add wheel chocks to the tires that remain in contact with the ground to help prevent accidents.
Once you securely mount your vehicle on the jack stands, remove the lugs from the wheels. Remove the fasteners with the tire iron or lug wrench. Then grab the tire and slowly pull it free from its mounting.
Removing the Drum Brake
Remove the drum brake from your vehicle. Look for a hole just outside the drum. The hole lets you reach the brake adjuster screw that controls how tightly the brake shoes press into the brake drum.
If you cannot see the brake adjuster screw in the access hole, turn the drum brake until the hole aligns with the adjuster. Then, turn the brake adjuster screw in the direction that loosens the brake shoes. When properly done, the shoes will stop tightly pressing into the brake drum’s surface. Now, pull the drum from your vehicle.
In some vehicles, the adjuster’s hole is in the backing plate. Attempt to remove the drum before loosening the adjuster. In some cases, you need to loosen the adjuster first before you can remove the drum.
Sometimes, the brake drum might resist your efforts to pull it out from your vehicle. If this happens, fetch a screwdriver and pry the drum off with the tool. You can also try to dislodge the part by hitting the drum in different places around it.
Clean the Drum Brakes
The time to clean the drum brakes has finally come. Depending on your preference, you can use a commercial brake cleaner or soapy water.
Brake cleaner is a commercial cleaning agent that helps remove dirt, dust, grease, and oil. It’s an aerosol stored in a spray can and suited for cleaning various car parts, such as the engine. Using it is as easy as spraying it on the brake drum, letting it work its magic, and then wiping or washing it off.
Alternatively, you can use soapy water. Dissolve dishwashing detergent in water and stir until it’s soapy. Pour the mixture into a spray bottle and squirt it over the drum brake.
Avoid breathing the brake dust. Wear a protective mask that keeps out the dust.
Reapply Brake Lubricant to the Drum Brakes
Whether you use brake cleaner or an alternative cleaning solution, you must lube the drum brakes after you finish. The drum brake is coated in grease, protecting the metal from harmful substances. Unfortunately, brake cleaner dissolves the lube, necessitating the reapplication of brake lubricant after the cleaning process.
Look for a brake lubricant that’s compatible with drum brakes. Apply it to the points where the backing plate touches the brake shoes. Most drum brakes have three contact points. See if you can pry the shoe away from the backing plate and put the lubricant on the points. Otherwise, you must remove the hold-down spring for lubing. Then apply lube to the shoe’s contact point at the top and the adjuster.
Avoid putting the lube on the brake shoes.
Reinstalling the Drum Brake and Wheel
Reinstall the newly cleaned drum brake and wheel on your vehicle. Then, repeat the cleaning process with the drum brake on your vehicle’s opposite side.
After returning the brake drums, adjust the rear brakes. Avoid tightening the brakes too much to prevent issues like the wheel locking up or the brakes wearing out early.
Additional Tips on Cleaning Drum Brakes
Make your life even easier with these tips on other matters related to cleaning the drum brakes:
Brake Cleaning Schedule
A good rule of thumb is to clean the drum brakes when you perform relevant maintenance tasks. For example, you will need to replace damaged or worn-out brake shoes. After installing new shoes, clean the drum brakes.
Work Safely
Always put on protective gear before working on the drum brakes. Some of the substances that have accumulated on the brake drum are toxic to humans. One example is brake dust, the residue created by contact between the brake shoe and brake drum. You don’t want to inhale or touch powdered brake shoe lining material and iron. Wearing a face mask, protective eyewear, and gloves can reduce the risk of breathing in brake dust.
If you’re going to work under your vehicle, take the necessary steps to stay safe. Ensure the jack stands remain secure while bearing your vehicle’s weight.
Cleaning vs. Replacing Drum Brakes
Sometimes, washing the drum brakes isn’t enough. The issue might go beyond dirt. Inspect the drum brake for physical damage and wear. If the drum’s surface bears grooves, scoring, or other signs of wear, don’t bother cleaning it. Instead, get a replacement drum brake.
In the same vein, check the brake shoes. The friction material that lines the shoe gradually thins out from use, especially if you hit the brakes hard. If the brake shoe lining becomes too thin, it can cause problems like reduced responsiveness and potential damage to the brake drum’s surface.
Where to Get High-Quality Drum Brakes for Your Vehicle
Before cleaning your drum brakes, you should ensure they still work properly. If their friction material has grown thin, then it might be best to replace them. Thankfully, CarParts.com has an array of high-quality drum brakes on hand and ready to ship from a warehouse near you.
We have a great selection of drum brakes that pass the highest quality control standards from the most reputable names in the industry. Simply fill out our vehicle selector to find the perfect drum brake for your ride. You can also use the search filters to find one according to your preferred brand, price range, quantity, and more.
Never go over budget when you shop from us. All our products come with a low-price and lifetime replacement guarantee, helping you get the best value for your money. Order now, and we’ll deliver the parts you need straight to your doorstep in as fast as two business days.
Feel free to give us a call when placing your order, too. Call us anytime using our toll-free hotline, and our team of customer service professionals will be ready to assist you.
Don’t miss out on the best deals on the market, and shop for high-quality drum brakes today!
Any information provided on this Website is for informational purposes only and is not intended to replace consultation with a professional mechanic. The accuracy and timeliness of the information may change from the time of publication.

