An automotive test light or circuit tester can check the presence or absence of electricity between two locations in a vehicle. This tool is used to test load carrying electrical circuits. A 12 volt test light is a handy visual indicator that voltage is available, but can’t measure current flow higher than the test light’s own current consumption.
Test lights for cars are composed of a handle similar to a screwdriver except that the handle is hollow with a flexible wire passing through a removable rear cap that provides a contact on the inside of the cap. Typically, there will be a spring between the bulb and the inside end of the probe, which extends like a screwdriver bit out of the handle except that it has a sharp tip.

Using the tool involves clipping the wire onto a metal component like your vehicle’s chassis or your battery’s negative terminal and then using the probe to check if any electricity passes through the probe into the wire or vice versa. If there’s electricity, then a light on the probe will illuminate.
In this article, we’ll discuss how to use a test light on a car.
Checking for Voltage
Just clip the wire to a ground source, which can be your battery’s negative terminal or your vehicle’s chassis, touch the probe to the positive battery terminal to make sure your clip connection is good and you have source voltage at the battery, and then use the probe to check for voltage at the test point.

If the circuit is switched on and you don’t have voltage at the test point, you need to find out why by checking the same circuit at a point closer to the source of the voltage. When you find voltage, the open circuit is between the place that illuminated the test light and the place nearest to it that didn’t.
In the video below, we demonstrated how all the voltage that was supposed to be leaving the battery wasn’t even making it into the battery terminal, even though the connection looked just fine. We found the problem with a test light.
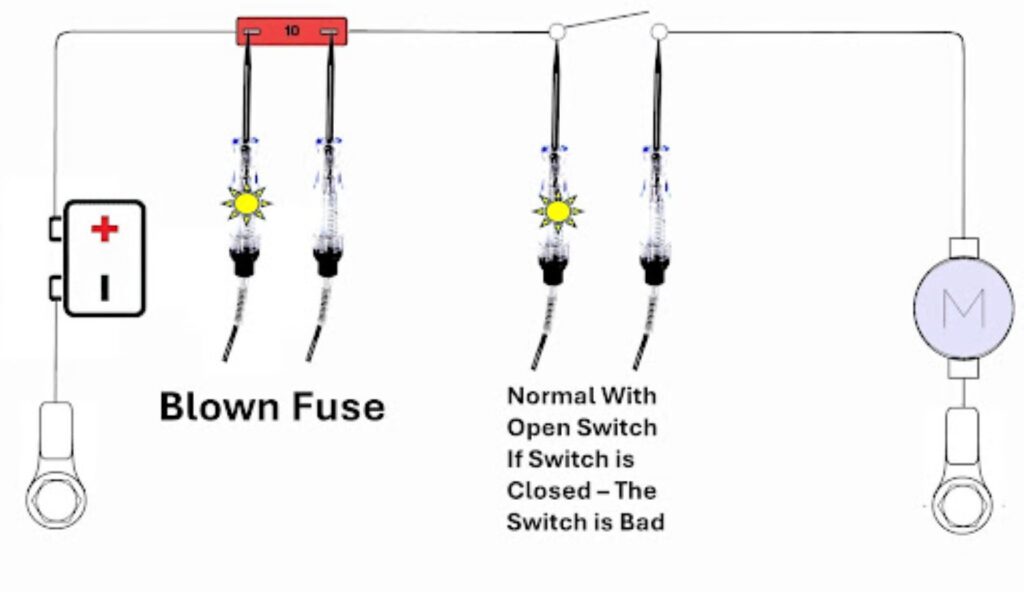
If you’re checking a switched load, you can check the fuse that feeds the switch first, then check the terminal that feeds power to the switch. Then turn the switch on and see if the power passes through the switch. If it doesn’t, the switch is faulty.
But there is a caveat here. If there is resistance in the feed to the switch, you may read voltage on the “hot” side of the switch until the switch is closed, and then the voltage may go away. At this point, you need to find the point of high resistance.
More Reminders About Using a Test Light
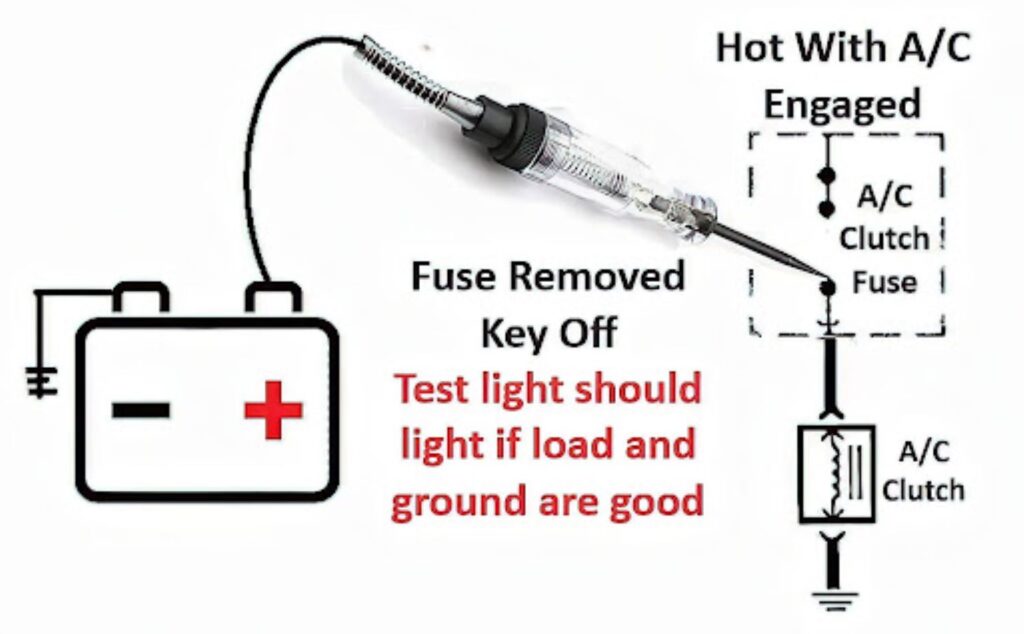
Connect the clip to the B+ battery post when checking for ground. But remember, even a low impedance test light only pulls ¼ amp (0.25). If the load pulls 5 amps, your test light might light up as if you had a good ground, yet as soon as the load is energized the ground may not carry the load. For more on this, watch this short video:
Even a low impedance test light only pulls ¼ amp (0.25). If the load pulls 5 amps, your test light might light up as if you had a good ground, yet as soon as the load is energized the ground may not carry the load.
–Richard McCuistian, ASE Certified Master Automobile Technician
In the video, a test light indicated there was power and ground at the fuel pump, but when the fuel pump was energized, the power and ground that would operate the test light bulb weren’t enough to operate the pump, which pulls at least 20 times as much current as the test light.
That’s the point of the short video: there was resistance in the fuel pump ground (dark) side of the circuit. It takes both good ground and good power (B+) for a circuit to work right.
You might notice in the video that we found the problem by using a headlamp bulb, which consumes about the same amount of current as the vehicle’s fuel pump when it’s pumping fuel (5-7 amps). When the tank is empty, the pump will pull only about 1.5 amps because the pump is spinning free.
Checking For Blown Fuses
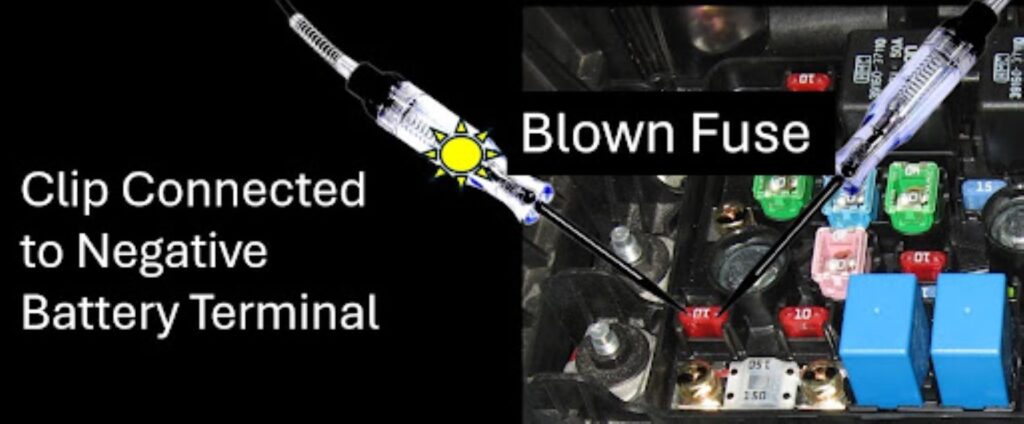
You can also use a test light to look for blown fuses in the vehicle’s fuse box. When certain electrical components are malfunctioning, finding the blown fuse can be challenging. Finding blown fuses using a test light is fairly easy. You can simply clip the test light onto your chassis, which provides a negative charge. Then, you can probe both metal contacts of each fuse to check if the current can pass through. If the test light only illuminates on one side of the fuse, then the fuse is likely blown.


Checking for Faulty Relays or Control Units
Aside from blown fuses, you can also check for faulty relays or control units for certain components. The process involves clamping the wire to a ground source like your vehicle’s chassis and then using the probe to check the positive and negative terminals of the suspect component. If the test light doesn’t illuminate when you probe the part’s negative terminal, then the component isn’t conducting electricity and it’s likely faulty. If the test light doesn’t illuminate when you probe the component’s positive terminal, then the part’s power source could be to blame.
Checking the Ground Path
All vehicle electronics have a ground wire that leads back to the vehicle’s battery or the vehicle’s chassis. The purpose of the ground wire is to give a circuit a way to discharge excess electrical current and protect the equipment from excess voltage and short circuits. Vehicle electronics need a reliable ground path, or else they won’t function. You can use the test light to check if an electric device has a good ground connection.
After confirming that a device has a reliable positive power source, connect the test light’s clamp to the positive terminal. Then, use the probe to check the ground component in question. If the tester illuminates, then it means there’s a solid ground connection. However, if there’s no illumination, you might need to clean contact points and inspect the ground path. Fortunately, re-establishing a ground path is a fairly easy task.
Keep in mind that you can potentially damage vehicle electronics if you don’t use the test light properly. If you connect the test light’s clip to a high-voltage power source and connect the probe to a sensitive electronic part, you can cause short circuits. Also, don’t poke your test light randomly. You should know what you’re inspecting so that you don’t damage sensitive components.
Some vehicle test lights can have a red and green light that can indicate whether you’re probing a ground circuit or a positive circuit. These types of test lights can be useful so that you can check the type of circuit that you’ve connected to the clip before you start probing.

How to Get a Quality Replacement Fuse
If using your automotive test light has shown that one of your vehicle’s fuses is on the fritz, it’s time to replace that fuse. Fuses are connected to many electrical functions, including various sensors. These sensors are integral to your vehicle running properly, so it’s best to replace fuses when needed. If you’re in search of replacement fuses, check out CarParts.com.
The CarParts.com website is easy to navigate, and we have a friendly and helpful customer service team ready to assist if you have questions about our large catalog, current deals, and policies and guarantees. They’re available around the clock, and will happily answer any of your inquiries.
Don’t leave a busted fuse in your fuse box. It might cause a ton of problems down the line. Purchase a replacement fuse from CarParts.com today.
Any information provided on this Website is for informational purposes only and is not intended to replace consultation with a professional mechanic. The accuracy and timeliness of the information may change from the time of publication.


