The cost of replacing an old or faulty heater core can quickly pile up. Not only do you have to purchase replacement parts, but if you bring your car to a professional mechanic, you must also take labor costs into consideration.
If you want to reduce expenses, you can try replacing the car heater core yourself. Note, however, that heater core replacement is typically a job best handled by a professional mechanic.
Tips on How To Replace the Heater Core
Here are some helpful tips and tricks for when you replace the car heater core of your car or truck if you’ve decided you want to take the plunge:

Prepare the Parts, Tools, and Equipment
The following is a list of the parts that you will need when you replace the heater core:
Furthermore, you will use the following tools:
- Gloves
- Haynes repair manual
- Pliers
- Ratchet and socket set
- Screwdriver set
- Socket extensions
- Trim removal tools
- U-joint drive
Inspect and Flush the Engine Coolant Beforehand
There are several maintenance jobs you must do before you can remove the faulty heater core and install its replacement. One such task is figuring out whether or not you must flush the engine coolant with the old core still in place.
Heated engine coolant flows through the heater core. The core collects heat from the fluid to increase the temperature of the air.
It’s important to check for contaminants and debris in the engine coolant. If the coolant appears dirty or contains debris, you must flush the engine cooling system and replace the fluid.
An engine coolant flush eliminates bad fluid and debris that might damage the heater core. This is crucial since you have to flush the coolant as part of the heater core replacement job. If you flush contaminated coolant after installing the new core, it might deposit contaminants and debris in the part, increasing the chances of issues.
Here’s an extensive guide on how to flush the heater core.
Discharge the A/C System
You must also discharge the air conditioning (A/C) system before you can get started on the job of heater core replacement. Otherwise, the refrigerant might cause complications as you install the new core.
The A/C system uses refrigerant to cool the air heading for the vehicle’s interior. It keeps the refrigerant pressurized for the best cooling effect.
To discharge your car’s A/C system, you must go to a certified shop with a refrigerant recovery machine. The A/C shop discharges the refrigerant from your vehicle and will properly dispose of the working fluid.
Put Helpful Labels on the Parts That You Remove
You must uninstall various parts and components to access the heater core. Eventually, you might end up with so many items that you can’t remember which part is supposed to go where at what point.
It’s critical to organize the myriad parts with labels that show their sequential order. Whenever you remove a part or component, put a length of masking tape on it. Write the item’s sequential order on the tape–use a magic marker to make the writing easier to read.
If the component is small or doesn’t weigh much, you can store it in a plastic bag and attach the container to the part that it came from.
Treat the Clips and Connectors With Care
The heater core includes several clips that secure smaller or more flexible parts to the core. The core also has connectors that join it to other parts, such as hoses. Clips and connectors are fairly flimsy, and the ones in older vehicles have probably turned brittle with age.
Exert utmost care when handling clips and connectors, especially if you own an older car. If you accidentally break one, you must find a replacement part with the same fit.
An Easier Way to Align the New Heater Core
One of the most challenging parts of heater core replacement is alignment. You must properly align the new core, or else it might get in the way of other parts. Unfortunately, it’s difficult to observe the inlet and outlet tubes of the heater core once you move the part through the opening in the dash.
You can get around this visibility problem by putting the heater core halfway through the opening first. Then poke your finger through the firewall and into the core’s outlet tube. Using your finger as a physical guide, move the outlet tube through the firewall, followed by the rest of the heater core.

How to Replace the Heater Core
Here are additional tips on replacing the heater core:
Ensure the Engine and Cooling System Are Cool
Check the temperature of the engine and cooling system. If one or both systems radiate heat, wait for them to cool down. Otherwise, the coolant flowing through the engine and cooling system will remain hot, and so will the heater core.
Don’t forget to detach the cable leading to the negative battery terminal. Disconnecting the battery ensures no power flows to various parts.
Find the Heater Core
Many heater cores are in the dashboard. If you can’t locate the core in the dash, consult your owner’s manual or documentation provided by the manufacturer.
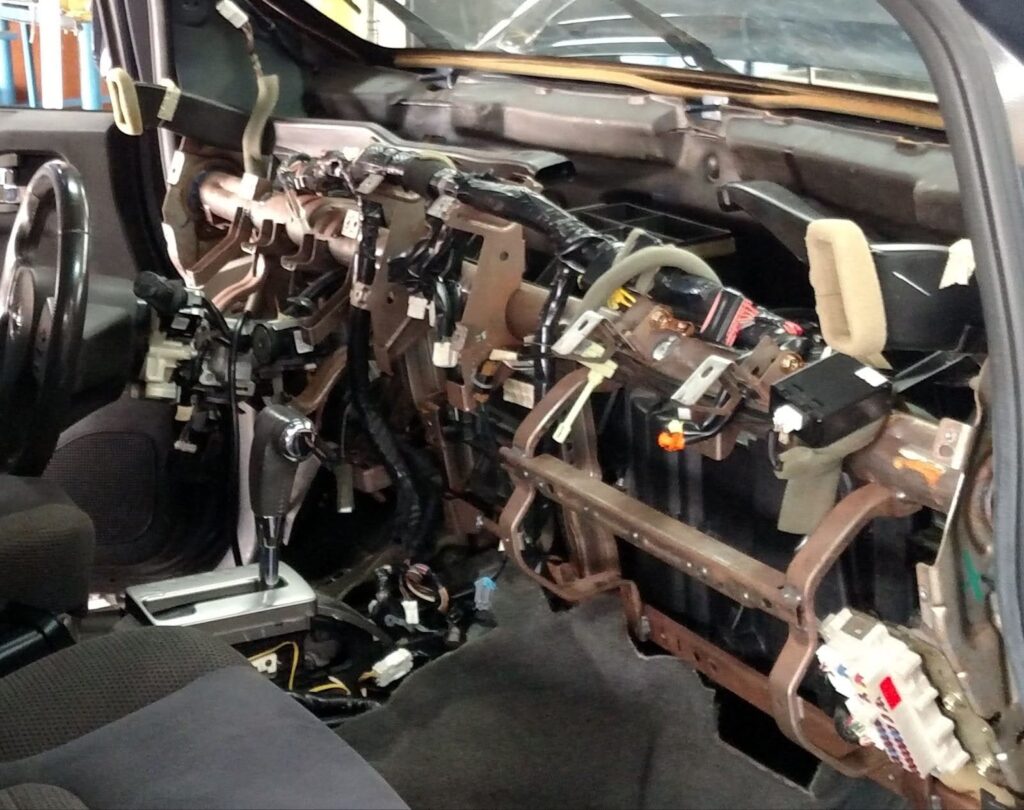
Remove all the parts that block the way to the heater core. In some vehicles, you can expose the core by removing the lower dashboard. Other models require more extensive disassembly of the dash.
Disconnect the hoses connected to the inlet and outlet tubes of the core heater. Seal the open lines and fittings to prevent contaminants from entering the engine cooling system through the exposed openings.
You must also uninstall the temperature blend door actuator. This actuator is the motor that operates your car’s climate control system. Don’t forget to detach the other electrical connectors to prevent accidents.
Remove the Fasteners With the Right Socket
Bolts secure the cover of the heater core, preventing the plastic component from moving. You need a socket that’s compatible with the fasteners. Otherwise, you might damage the bolts when you remove them with the wrong socket.
Some heater core covers conceal their bolts for various reasons. You can locate these hidden fasteners with socket extensions and U-joint pullers.
Getting Your Hands on a New Heater Core
A bad heater core can make driving less enjoyable during the colder months of the year. Because of this, it’s important to replace the faulty part as soon as it is needed. Fortunately, finding a compatible replacement heater core is easy with the help of CarParts.com.
The best part? You don’t even have to take one step outside your door to get your hands on a new heater core. Simply use your mobile device or computer to visit our website. Check out our easy-to-use vehicle selector, and toggle our search filters to narrow down your options according to your preferred brand or price range.
All HVAC components in our catalog are sourced from some of the top parts manufacturers in the industry. Our team of automotive professionals carefully vet items before they’re included in our catalog to ensure their reliability and performance.
Don’t hold off on ordering a new heater core for your vehicle. Shop and get the parts you need in as fast as two business days!
Any information provided on this Website is for informational purposes only and is not intended to replace consultation with a professional mechanic. The accuracy and timeliness of the information may change from the time of publication.


