Stopping your vehicle might seem simple, as it only takes a step on the brakes to start slowing down. However, it involves many components working together, including the brake pads.
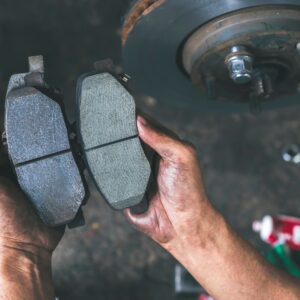
These pads convert kinetic energy to heat energy using friction. Naturally, you’ll have to replace the pads once they wear. However, issues like brake pad glazing can cause the need for an early replacement.
What are Glazed Brake Pads?
Brake pad glazing occurs when the braking temperature exceeds the limits of the brake pad friction material. The brake friction material hardens or crystallizes because of the heat, resulting in a glazed look.
There are two types of glazing: light glazing and deep glazing.
Light glazing isn’t too big of an issue, as it’s self-correcting. This means the glaze will be gone in a few hundred miles through normal brake use.
On the other hand, you’ll notice more damage on the brake pads with deep glazing. These aren’t self-correcting, so you might need to replace the pads entirely.
Symptoms of Glazed Brake Pads
Some symptoms of a glazed brake pad include decreased braking performance, brake shudder/vibration, and excessive stopping distance. These are issues you should keep an eye out for, as glazing can lead to damage to other brake system components.

Decreased Braking Performance
When the brake pads are glazed, the friction materials become smooth and glassy, which means the pads can’t provide enough friction with the rotors to stop the vehicle.
Brake Shudder/Vibration
Glazing doesn’t only affect the brake pads, as it could also transfer to the brake disc (rotor). This phenomenon could result in a noticeable brake shudder or vibration when brake pad materials build up unevenly on the rotor.
The rotor rotates with the wheel and is clamped by the brake pads fitted to the caliper to create friction. In short, it’s part of a system that generates brake torque to stop the vehicle.
Once the rotor or the pads are compromised, you might feel a strange sensation when stepping on the pedal on top of the aforementioned decreased braking power. This could manifest itself in vibration, pulsation, or shuddering.
Increased Stopping Distances
Stopping distance is the distance your vehicle travels between the time you step on the brake pedal and the time it takes to come to a complete stop. Several factors could affect stopping distances, including speed, vehicle weight, road conditions, and, of course, brake conditions.
As such, any damaged component in your braking system could negatively affect the stopping distance. A glazed brake pad could increase the braking distance because it’s one of the components that generates brake torque.
Needless to say, driving with excessive braking distance is dangerous because it increases the likelihood of crashes and accidents.
Causes of Glazed Brake Pads
Some common causes of glazed brake pads include constantly hard braking, driving with a foot on the pedal, continuous braking on a downhill, and a compromised caliper.

Hard Braking
Hard braking, especially at high speeds, increases the temperature within the braking system to the point where the pad material can’t handle it anymore. As a result, the material deteriorates, resulting in a pungent burning smell and glazed brakes.
Driving With Foot on the Pedal
One no-no when it comes to driving is riding the brakes. This is when you keep one foot on the pedal at all times, enough to keep the brake lights seemingly turned on the entire drive.
Riding the brakes wears out the brake pads and other components because the pads make contact with the rotor most of the time. This increases the temperature within the system, resulting in glazing.
Continuous Braking on a Downhill
Similar to hard braking at high speeds and riding the brakes, continuously stepping on the brake pedal while moving downhill will increase the temperature, causing the glazing. While it’s understandable why some drivers do this, there are better ways to traverse downhill.
One way you can safely overcome a steep decline is by downshifting to a lower gear to let you regulate your car’s speed and prevent damage to the brakes.
Compromised Caliper
A compromised caliper could result in uneven brake pad wear, leading to glazing. This happens because a stuck caliper wears out the pad it’s pushing against. A damaged caliper can also result in soft brake pedals, reduced stopping power, and pulling.
How to Fix Glazed Brake Pads
To fix a glazed brake pad, you may have to replace the brake pad and the rotors. Before you do, you’ll need the following tools and equipment:
- Safety goggles
- Gloves
- Wheel chocks
- Breaker bar
- Hydraulic jack
- Wire brush
- Brake lubricant
- Torque wrench
Afterward, follow the steps below:
- Step 1: Park the vehicle and install the wheel chocks. Wear your goggles and gloves.
- Step 2: Open the hood and check the brake fluid reservoir. Remove some fluid if it’s full to avoid spills.
- Step 3: Loosen the lug nuts using a breaker bar before raising the vehicle using a hydraulic jack. Afterward, remove the lug nuts and the wheels.
- Step 4: Remove the caliper bolts. The removal process may differ depending on your vehicle.
- Step 5: Remove the pad and the rotor. You might need to remove the caliper mounting bracket before getting to the rotor.
- Step 6: Use a wire brush to remove rust from the hub surface to avoid pedal pulsation.
- Step 7: Install the new rotor and the new hardware to avoid vibration. Apply brake lubricant at the slide points before installing the hardware.
- Step 8: Install the new brake pads, but take note of the wear-sensor position orientation to properly install them because different pads have different wear-sensor placement.
- Step 9: Check the brake caliper and piston and inspect for any brake fluid seepage. If they’re both clean, use the front/rear disc brake pad spreader set to safely seat the caliper piston.
- Step 10: Reinstall the caliper you removed earlier. Don’t over-tighten, as it could lead to bigger issues. Afterward, top off the brake fluid reservoir.
- Step 11: Pump the brake pedal until it feels firm. Afterward, install the wheel and lower the vehicle.
All these steps can be quite overwhelming, and understandably so. Fortunately, you can always go to a mechanic to have them replace the brake pads. On average, that’s about $100 to $300 per axle. It could go as high as $600 if you’re replacing both the front and rear brake pads. Of course, if you do it yourself, you could get by for a lot less money.
Where to Get New Brake Pads for Your Vehicle
The bad braking performance and increased stopping distance that accompany glazed brake pads can put you at risk on the road. The last thing you want is to get into a hairy situation with bad brakes. Things can quickly go from bad to worse that way, so get your hands on a new set of brake pads fast at CarParts.com.
CarParts.com offers fast shipping for our wide selection of quality aftermarket products from trusted brands, including brake pads. We built our strategically located warehouses to best serve you. It won’t take long for your new brake pads to arrive after you’ve placed your order on our easy-to-navigate website. If you order from the continental US before 12 pm ET, we can deliver your new brake pads straight to your address in as fast as two business days.
Don’t risk putting off brake pad repairs for too long. Order a new brake pad set now from CarParts.com.
Any information provided on this Website is for informational purposes only and is not intended to replace consultation with a professional mechanic. The accuracy and timeliness of the information may change from the time of publication.


