Found in the doors of your car or truck, the moisture barriers behind the door panel prevent the inevitable water vapor inside the door from causing mold/mildew on the back side of the door panel, which may cause odors and health problems. This won’t usually happen, but this is why the barrier is there, to protect vulnerable parts of your vehicle from corrosion and damage. If you must replace the interior door panels, exert care when handling the moisture vapor barriers.
What is a Car Door Vapor/ Moisture Barrier?
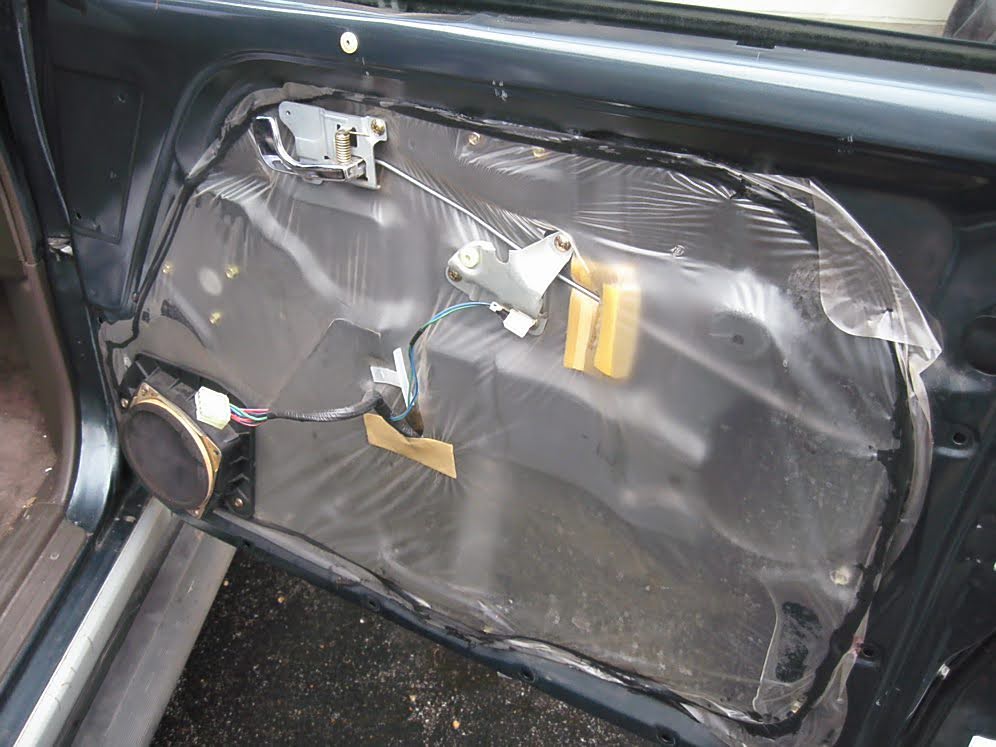
The moisture/vapor barrier, also sometimes called a dust or water barrier, is a protective sheet attached by glue or sticky black putty to the interior of the car door frame. You won’t see it unless you remove the door panel, and it needs to be carefully peeled back out of the way when you’re performing repairs inside the car door (power window repairs, etc.).
On older cars, it might be brown paper with a tar-based backing, but on newer vehicles it’s usually made of plastic.
Most door bottoms have weep holes that rapidly drain the fluid out of the door. The water barrier keeps moisture and condensation from reaching the door panel and interior.
And while this part is important, there are DIY people and inexperienced mechanics who will totally remove it and not put it back when performing repairs inside the door.
This isn’t the kiss of death, and you may never experience an issue if the moisture barrier has been left out, but it’s best to make sure it’s in place. If you find that somebody else left it off, you can use a piece of plastic (even a garbage bag) and some tape to replace it.
What Does the Moisture Barrier Do?
The primary job of the vapor barrier is to block water vapor. It keeps the interior of your vehicle dry, ensuring your comfort and protecting various parts that might develop issues if exposed to moisture.
As a Water Seal
Protects Wooden and Wood-Based Parts
Some vehicles have trim made of wood or a material based on wood. One popular material is particle board, an engineered product made from wood chips and a synthetic resin that binds the material together when heated and put under pressure.
Wood looks great and can usually take a beating, especially if coated in a protective layer, such as varnish. However, the material remains vulnerable to moisture. If condensation forms on the surface of the wood, it can cause the material to swell and rot. Particle boards tend to rot faster than conventional wood material in the presence of moisture.
Fortunately, the vapor barrier stops water vapor from condensing on the door panel, protecting nearby wood or wood-based trim from moisture.
What Happens If the Vapor Barrier Fails?
Vapor barriers generally last a long time unless somebody accidentally tears them off and doesn’t put them back (and this happens more than you know) They need to be in place, but if they’re not, nothing bad will happen; this isn’t a car killer.
If you remove the water barrier, it’s best to reinstall or replace it before putting the door panel back in place.
How to Replace a Car Door Moisture/Vapor Barrier?
Installing a new vapor barrier doesn’t require much experience in automotive repair. You can even perform the job yourself if you need to after doing work inside the door and have the door panel off anyway.
Home-Made Vapor Barrier
While you can get a vapor barrier from a shop, you can also use a home-made barrier. Find a sheet of heavy plastic film that fits over the door frame.
Attaching the Vapor Barrier
Most door vapor barriers use butyl tape to attach them to the door frame. Indeed, many car manufacturers also use the same type of adhesive tape on their stock water barrier.
Older models might use tack strips to attach the vapor barrier. They pin the plastic sheet against the frame. Depending on the design, you might want to apply adhesive.
Alternatively, you can get a tube of silicone adhesive. Apply the glue to the surface of the door frame before attaching the vapor barrier. Cut out the excess parts of the plastic film.
What you shouldn’t use is duct tape or other conventional tape. They can dry out over time, losing their stickiness and forcing you to clean them before using a different adhesive.
Cut Openings in the Vapor Barrier For Wires
Mark the spots on the plastic sheet where you must cut slits or holes for the wires to exit the door. Cut the openings and draw the wires out through them.
Next, cut out patches from the excess plastic sheet. Place a patch over each opening to act as a waterproof cover. Apply butyl tape to the edges of the patch to seal the patch against moisture.
Any information provided on this Website is for informational purposes only and is not intended to replace consultation with a professional mechanic. The accuracy and timeliness of the information may change from the time of publication.


