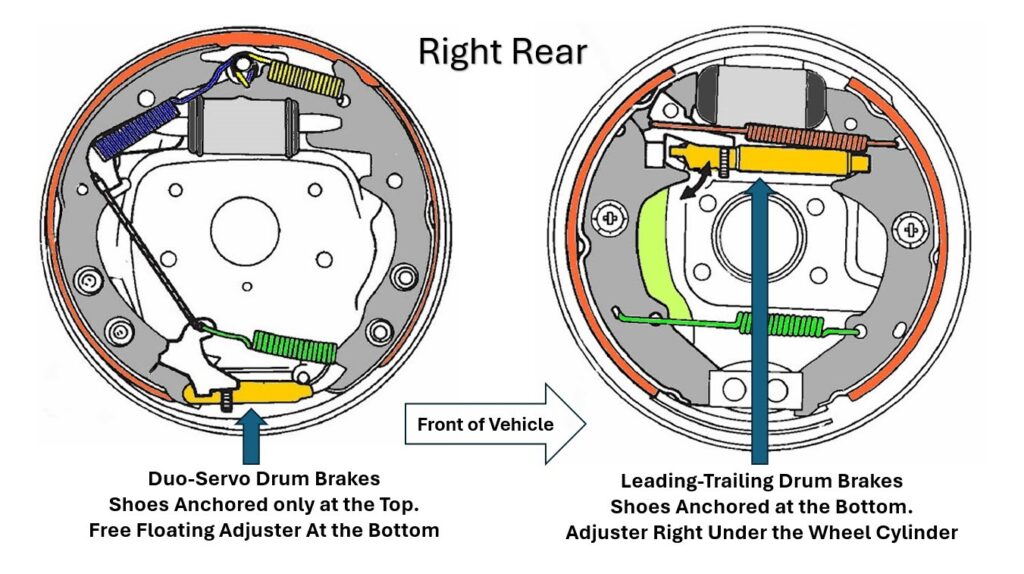
Drum brakes lose responsiveness as they wear down. Fortunately, you don’t always have to immediately replace them, which would otherwise cost too much. Instead, you can adjust drum brakes to compensate for worn components, restoring your vehicle’s braking performance to acceptable levels.
While you can find a mechanic to adjust the drum brakes, why not do the job yourself? As long as you have the required equipment and sufficient experience in DIY auto repair, you can save on labor costs for drum brake adjustment.
How to Adjust Drum Brakes
You’ll need tools and equipment including wheel chocks, a jack, jack stands, a flashlight, a brake spoon, and a screwdriver.

The Right Work Area for Drum Brake Adjustment
You’ll want a flat, level, and spacious work area, preferably on concrete rather than grass, dirt, or asphalt. with sufficient room around your vehicle to ensure unimpeded access to the drum brakes underneath.
Generally, your garage is the best place for drum brake adjustment if you have the space. There is a roof and walls that shield you from the elements, illumination provided by lights, and easy access to your tools.
You might feel tempted to park your vehicle on the driveway and adjust the drum brakes, but it’s not advisable due to many factors, including driveways having slight inclines that increase the difficulty of drum brake adjustment. Even if you engage the parking brakes and place wheel chocks behind the tires, there’s always a risk of your vehicle sliding down the inclined surface.
Remove the Rear Wheels? Not Necessarily
If you don’t need to remove the brake drum to inspect the brakes and you can raise your vehicle high enough to gain access (on a creeper, preferably) you can easily adjust the brakes without removing the tire. As a matter of fact, it’s easier this way because you need to spin the tire while adjusting the brakes to make sure you don’t adjust the brakes too tight.
In some vehicles, the rear wheels block easy access to the drum brakes. You must get the wheels out of your way to adjust the brakes. On others, you have to go through the outside of the brake drum or the wheel may not be in the way at all. It varies from OEM to OEM.
Other vehicles position their rear wheels to let you get at the drum brakes. However, the wheels might still get in your way because of their size and mass. If you prefer having lots of elbow room, consider uninstalling the rear wheels to make your life easier.
However, consider as well that it’s easier to determine when you have the brake shoes adjusted to the proper clearance if you leave the wheel in place, and turn the drum using the wheel while adjusting the brake shoes.
Different Locations For the Drum Brake’s Access Hole

Drum brakes have an access hole that lets you reach inside them to work on their internal components. The oblong-shaped hole seals itself close with a rubber plug.
The access hole’s location can vary between vehicle models. It’s commonly found on the brake drum, at the bottom of the brake backing plate, or above the axle. If you can’t find the access hole, consult the appropriate manual.
How to Use the Drum Brake Adjuster
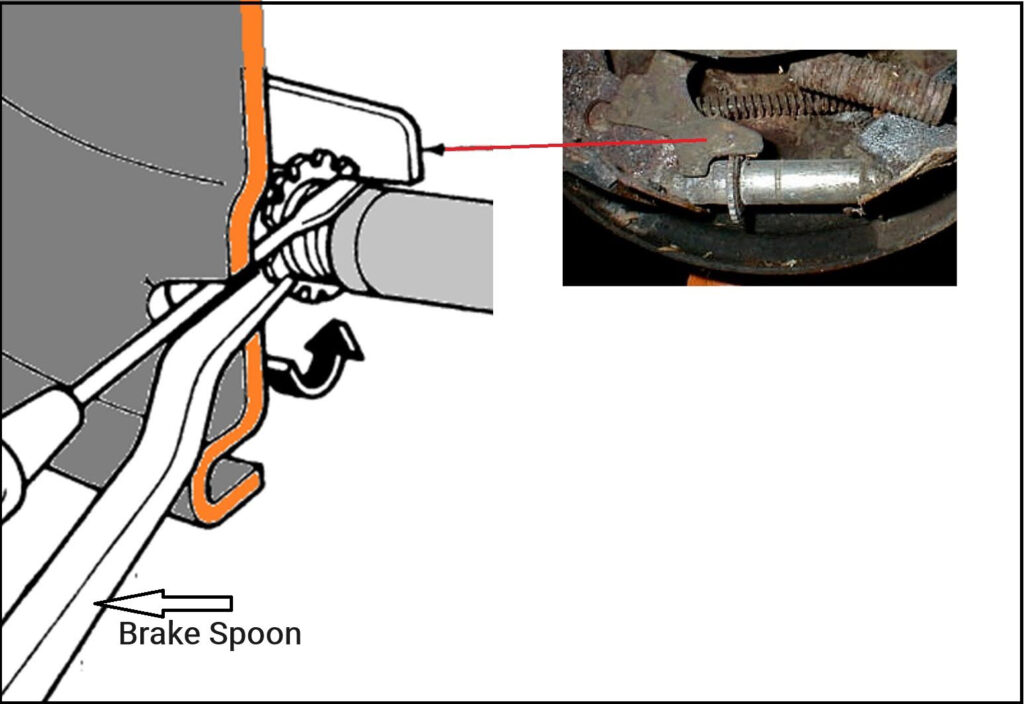
You can tighten the drum brakes by working on the drum brake adjuster, a cylindrical part with a notched disk called a star wheel running around its diameter. The star wheel ensures the adjuster only rotates in the direction that tightens the drum brake.
You operate the drum brake adjuster with a brake spoon, a tool that can reach into the access hole and engage the notches of the star wheel. Once the spoon locks with the notches, move the tool up and down like how you would use a lever. The movement rotates the cylinder, which moves the brake shoes closer to the brake drum.

The brake shoes will click as their liner scrapes across the surface of the brake drum. Wait several clicks before spinning the car wheel to see if the brake has tightened. If the wheel spins past one complete rotation, keep adjusting the drum brakes until the part stops after one full rotation.
How to Loosen Tight Brake Shoes
Be careful when you adjust the brake shoe. If you tighten the shoe too much, you might lock it against the brake drum.
Fortunately, you can undo such a mistake by loosening the brake shoe. Insert a screwdriver into the access hole and pry the adjuster arm away from the star wheel, allowing the adjuster to rotate in the opposite direction.
Use the brake spoon to engage the star wheel and rotate the adjuster in the opposite direction to loosen the brake shoe. Then use the screwdriver to lock the adjuster arm with the star wheel.

Test the Adjusted Drum Brakes With a Quick Drive
Always follow each drum brake adjustment with a test drive. Keep your vehicle’s speed between 15-20 miles per hour as you hit the brakes to seat the brake shoes properly.
Why Do Drum Brakes Need Adjustment?
Usually brakes don’t need adjustment unless you’re replacing the brake shoes. Even though the lining wears thinner with use, the automatic adjusters will keep the brake shoes in adjustment all the way to the point where the lining is gone and it’s metal to metal. The brakes are designed to stop the vehicle until they’re so totally worn out that they fall apart. But don’t ignore brake noises from any of the brakes. Always check them or have them checked if you hear or feel something that seems abnormal.
Usually brakes don’t need adjustment unless you’re replacing the brake shoes.
– Richard McCuistian, ASE Certified Master Automobile Technician
Vehicles With Drum-Type Parking Brakes
Most new vehicles use disc brakes that can adjust themselves. Disc brakes have caliper pistons that can extend to compensate for increasingly thinner brake pads.
However, some models use a drum brake as a parking brake. One of the advantages of drum brakes is lower cost, so manufacturers sometimes save on production expenses by using them as a parking brake.
Like their full-time brethren, drum-type parking brakes will need adjustment at intervals. You don’t want to fail a state vehicle inspection because of a loose parking brake.
What Happens After I Receive My Drum Brakes?
If you receive your drum brakes, you can do the replacement and get your ride back on the road in no time. However, if you have any problems with your order, don’t worry. With a CarParts+ membership, you’re free to return any of the orders you’re unhappy with for up to two months.
CarParts+ offers excellent benefits, including extended 60-day returns. So you won’t have to worry about being stuck with components incompatible with your vehicle.
You’ll also get access to other exclusive perks, such as VIP Customer Service, Free Shipping, and 24/7 roadside assistance. Sign up today to have that extra confidence on the road.
Any information provided on this Website is for informational purposes only and is not intended to replace consultation with a professional mechanic. The accuracy and timeliness of the information may change from the time of publication.


